How to distribute WhatsApp conversations among the agents?
WhatsApp's conversations are conducted through Zoho Cliq channels.
Each channel can include one or more agents that are able to communicate via WhatsApp with the users.

Check these articles about Cliq channels and livechat agents for more information.
An agent can be included in a channel automatically when the channel is created, manually after the channel's creation, or even can choose to leave a channel. Check this video to understand how to design your agent assignation:
The way to configure the solution depends on how you prefer to work with your team. The different options are:
- Define access permission levels to the channels
- Privacy settings
- Understand Cliq "Teams" configuration
2. Include or remove agents manually from Cliq channels
- WhatsApp Team
- Agent includes himself via Cliq
- Agent includes himself via Zoho CRM
- Colleague adds an agent via Cliq
- Agents leave a channel
3. Include agents automatically to Cliq channels
- Using Zoho Cliq FREE version
- Using Zoho Cliq PAID version or Zoho One
- WhatsApp Control team
- Agent distribution feature
If after reviewing all the options you still have doubts on how to apply them to your business case, please contact support@woztell.com and we will guide you.
Let's get into all the details about the configuration options:
1. Define access permission levels to the channels
- Privacy settings
Only agents that have access to the lead or contact in Zoho CRM can be included automatically or manually to the channels. Agents without access to lead and contact profile will not be able to contact them via WhatsApp or see the historical conversation in CRM.

To activate this option you must contact support@woztell.com and request it.
- Cliq "Teams"
"Teams" is a feature that exists in Zoho Cliq paid version or Zoho One, and that only the Zoho Cliq super admin can visualize and edit. After the Woztell setup two new "teams" will appear: - WhatsApp control team
- WhatsApp team
Both "teams" represent all the people in your company that are able to chat via your WhatsApp account with your users.
Example:
If you are using WhatsApp for sales, only your sales team and their supervisors will need access to WhatsApp. Therefore, they need to be included in the WhatsApp Control team or WhatsApp Team. On the other hand, someone from your HR team will not need to have access, and therefore should not be included in either "teams".
The differences between including a person in the WhatsApp control team or WhatsApp team are described in the sessions below about automatically or manually including users in the "teams".
2. Include or remove agents manually from Cliq channels
- WhatsApp Team
The agents in this team have access to the channels, but are not automatically assigned to them. They can either add themselves or be added to channels by colleagues.
To include agents to WhatsApp team, access Zoho Cliq with an administrator account and follow these steps:
- Click on the avatar photo located in the upper right corner,
- Click on "Administrator Panel"
- Click on "Teams"
- Find the WhatsApp Team
5. Add agents to the team. You can choose to add them as moderator or member. For the Woztell solution, the only difference is that a moderator can exclude members from channels, and members can't.
- Agent includes himself via Cliq
The agent needs to be either in the WhatsApp Control team or WhatsApp Teams, in order to proceed with the steps below and add themselves to a channel. - Go to Cliq
- In the session "Channels", click join
3. Search for the channel, and click "Join"
- Agent includes himself via Zoho CRM
The agent needs to be either in the WhatsApp Control team or WhatsApp Teams in order to proceed with the steps below and add themselves to a channel.
1. Open CRM
2. Open the profile of the lead or contact that you want to talk to
3. Click on the button "Go to channel"
- Colleague adds an agent via Cliq
The agent needs to be either in the WhatsApp Control team or WhatsApp Teams in order to proceed with the steps below and add themselves to a channel.
1. Go to Cliq
2. Open the channel where you want to add a colleague
3. Click on "Participants"
4. Click "Add participants"
5. Select the user you want to add
- Agents leave a channel
An agent can leave a channel at any time; it is important to keep in mind that when the agent leaves the channel, they will stop seeing it in their Cliq and receiving notifications for new messages.
To leave a channel, follow the steps below:
1. Go to Cliq
2. Open the channel you want to leave
3. Click on "Action"
4. Click on "Leave"
3. Include agents automatically to Cliq channels
- Using Zoho Cliq FREE version
If you have the free version of Zoho Cliq, all people in your organization that have a Zoho Cliq account will be added automatically to all channels created.
This means that they will receive the messages from all the users conversations.
Pro: all agents will receive the user's messages, and anyone can respond.
Con: probably not all people in your organization are going to be an agent responsible for dealing with leads or clients, so this option is confusing as you can have a person that just needs to use Zoho Cliq for company internal communication receiving external contact messages.
For a better experience in using the Woztell solution for conversation via WhatsApp, we recommend you have the Zoho Cliq paid version or Zoho One.
We only recommend using the Zoho Cliq free version, if you will only use Woztell to access the WhatsApp API to send push notifications, and don't need to manage the conversations. In this case, you can have an account in Cliq only for your super admin, and use it as your interface to approve templates quickly, but not as your tool to manage conversations.
- Using Zoho Cliq PAID version or Zoho One
- WhatsApp Control team
All agents included in the WhatsApp Control Team will be added automatically to all channels created, starting the moment you include them.
If you need to add a new agent to a channel that existed before he was included in the WhatsApp Control Team, it must be done manually. If you have to add new agents to a huge volume of existing channels, like one hundred or more, you can request support@woztell.com to help you with it.
To include agents to WhatsApp control team, access Zoho Cliq with the administrator account and follow these steps:
- Click on the avatar photo located in the upper right corner,
- Click on "Administrator Panel"
3. Click on "Teams"
4. Find the WhatsApp Control Team
5. Add agents to the team. You can choose to add them as moderator or member. For the Woztell solution, the only difference is that a moderator can exclude members from channels, and members can't.
The super admin needs to be included in both teams as a moderator for the Woztell integration to work. It will be included in the account setup, and you should never remove it.
- Agent channel distribution feature
This optional feature will assign new channels in a proportional way among a defined agent group. It improves agent productivity, because it allows them to focus only on the users they are responsible for.
From the defined group of agents, this feature includes one agent per channel.
Please note that the agent inclusion is random, so sometimes an agent may get more than one channel assigned in a row, however, over time it averages out to be even among the selected users.
WhatsApp Control Team users will still, by default, be included in all new channels.
This feature activation will affect only new channels created after it's configuration. Already-existing channels will not be affected by enabling this feature.
There are two main steps to activate the feature:
- Setup a database in Zoho Cliq: you need to do it once to activate the feature
- Assign the agents in the database: this is how you will configure and manage your agents and the channel distribution on a daily basis.
A. Setup a database in Zoho Cliq
- Log in to Zoho Cliq using the Super Admin account.
- Click on the profile picture in the top right corner, then select "Bots and Tools"
3. Click on "Databases" on the left side, and then click the green "Create Database" button in the middle.
4. In the "Unique Name" field, input in lowercase letters: woztellagentassignment
5. In the "Display Name" field, input: Woztell Agent Assignment
6. In the "Description" Field, input: Automated Agent Assignment by Woztell
7. Click "Save & Edit Fields" in the bottom-right corner
8. Using drag-and-drop, you will be adding and adjusting 6 fields. Each time you drag-and-drop a "Field Type" into the center of the page, you will get a "Create Field" section on the right side of the browser window. After each field is completed, click "Save" in the bottom-right corner, and then move on to the next field.
Add the Fields in the exact order below with the exact values provided below:
- Field Type: Text
- Field display name: Email
- Field unique name: email
- Tick the box for "Make this field mandatory"
- Click "Save"
b. Field Type: Number
i. Field display name: Percentage
ii. Field unique name: percentage
iii. Add default value: 0
iv. Tick the box for "Make this field mandatory"
v. Click "Save"
c. Field Type: Boolean
i. Field display name: Agent Status
ii. Field unique name: status
iii. Add default value: TRUE
iv. Tick the box for "Make this field mandatory"
v. Click "Save"
d. Field Type: Text
i. Field display name: Weekday
ii. Field unique name: weekday
iii. Click "Save"
e. Field Type: Text
i. Field display name: Start Time
ii. Field unique name: starttime
iii. Add default value: 00:00
iv. Tick the box for "Make this field mandatory"
v. Click "Save"
f. Field Type: Text
i. Field display name: End Time
ii. Field unique name: endtime
iii. Add default value: 23:59
iv. Tick the box for "Make this field mandatory"
v. Click "Save"
g. Field Type: Text
i. Field display name: Phone Number
ii. Field unique name: phonenumber
iii. Click "Save"
h. Click "Save Fields" in the bottom right corner
Email support@woztell.com and tell us you have completed these steps and you want to activate the option, and we will activate it for you.
As soon as you receive a reply from our support team with an activation confirmation you can continue by selecting your Time Zone.
9. Set your Time Zone in the Woztell Extension Settings in CRM
a. Open CRM in a separate tab
b. Go to "Settings" using the tools icon in the top-right corner
c. Click "All" under Marketplace
d. Click "Installed" at the top
e. Click "Settings" under the entry for the Woztell extension
f. Select your Time Zone
g. Click Save.
You can continue to include agents to your database following the steps in the next section.
B. Including agents in the database
All the agents to be added in this table need to be included in WhatsApp teams first, then follow the steps below:
- In an Administrator account in Cliq, click on the profile picture in the top right and then click "Bots and Tools",
- Click "Databases" on the left side. Hover your mouse over "Woztell Agent Assignment" in the database list, and click on "View Database".
The database is where you can add agents for automatic assignment, adjust their settings, or remove them.
3. Add a user by clicking on the "+" icon in the top right, or to edit an existing user, click on their entry in the list then select "Edit" on the bottom right side.
4. In the edit window you will be able to do the following:
- Agent status: change it to "True" when this agent is active and "False" when you don't want this agent to be included in the channels. You should use this option when the agent will be out of office for a long period, like when they go on vacation. We don't recommend you switching it on and off, if the agent doesn't work for one or two days, because you might forget to switch it on again the next day. We will give you tips at the end on how to manage these short term changes.
- Percentage: The percentage is treated as a proportion, so when you input a number, the system will make a sum total of all the percentage numbers for the users in the list, and then assign channels based on their number out of that total. So, you can make the value sum 100% or not and it will work.
Example:
Imagine you have three users, you can directly assign 33% per person to sum 100%, or include a random number like:
User |
Percentage |
40 |
|
40 |
|
40 |
Sum of percentage values: 120
So, for each user they will receive 40/120 = 33%
You could have used instead of 40, the value 100 each and the result would be the same. The system would calculate the total 3 x 100 = 300, and then the amount per user that would be 100/300 = 33%.
c. Email: is the agent's email
d. Phone number: if you only have one number you should leave this field blank. In case you have multiple numbers, this is the field that
enables you to select which agent will be included in the channel of specific numbers.
enables you to select which agent will be included in the channel of specific numbers.
The number format needs to be 00 and "Country code" and "phone number". Example for Spain, where the country code is 34: 0034676767767
e. Weekday: a standard setup will leave the "Weekday" field blank, which will result in the agent assignment proportions being active every day, including work days and weekends. If you have shifts, you will need to add a row for each weekday worked per agent.
f. End time: the time format is defined as 24h a day. The end time is the time that the system will stop including the agent in channels. By default it will be 23h 59min (23:59). So, if your team leaves the office at 7 pm (19 h) and you don't have anyone to answer at night, you should leave the end time at 11:59pm (23h 59min) for all agents, otherwise after 7pm no agent will be included in the channels, and they will not be able to review and continue the chats that entered at night when they arrive at the office the morning of the next day.
g. Start Time: the time format is defined as 24h a day. The start time is the time that the system will start including the agent in channels. By default it will be 00h (00:00). So, if your team arrives at the office at 8 am (8 h) and you don't have anyone to answer before that time, you should leave the start time as 12 am (00h) for all agents, otherwise before 8am no agent will be included in the channels, and, when they arrive at the office, they will not be able to review and continue the chats that entered in the early morning.
Let's review two examples:
- Agents with the same, fixed shifts during a week:
You have two agents that work from Monday to Friday from 8am to 5 pm. Your company only has one WhatsApp number, therefore the phone number will be blank.
As both agents are responsible for all messages on any weekday, this parameter is blank.
In "Database parameters" below, this is what your database needs to look like after you finish adding the agents information:
2. Agents with different shifts throughout the week:
You have a team that has Agent 1 working Monday to Friday from 8am to 5pm, and Agent 2 that works from Wednesday to Sunday from 8am to 5pm. Your company only has one WhatsApp number, therefore the phone number will be blank.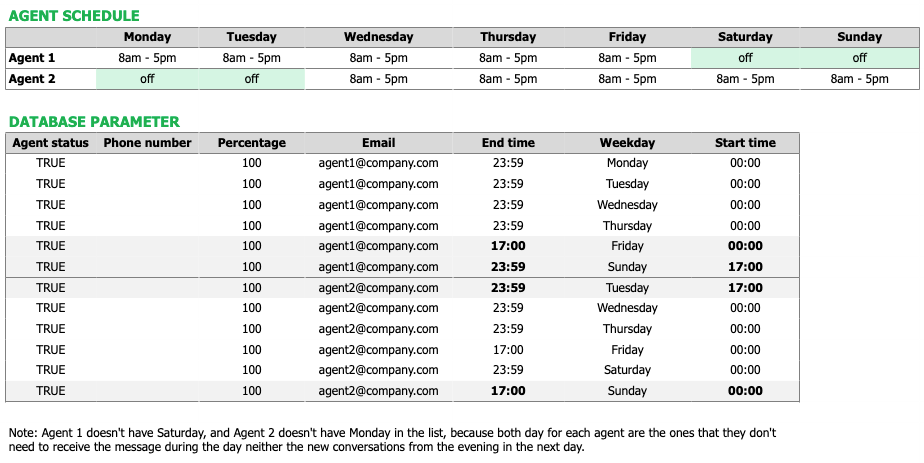
You have a team that has Agent 1 working Monday to Friday from 8am to 5pm, and Agent 2 that works from Wednesday to Sunday from 8am to 5pm. Your company only has one WhatsApp number, therefore the phone number will be blank.
In "Database parameters" below, this is what your database needs to look like after you finish adding the agents information:
FAQ
- Can I assign specific conversations to a specific agent?
This is common when each product in a company is managed by different teams or agents. By default, Woztell's agent assignation features don't allow this level of precision in distributing conversations. You can achieve that with chatbots and customization, only feasible when contracting a project with one of our partners. If you are interested, please contact presales@woztell.com, and our sales executives are happy to help you.